

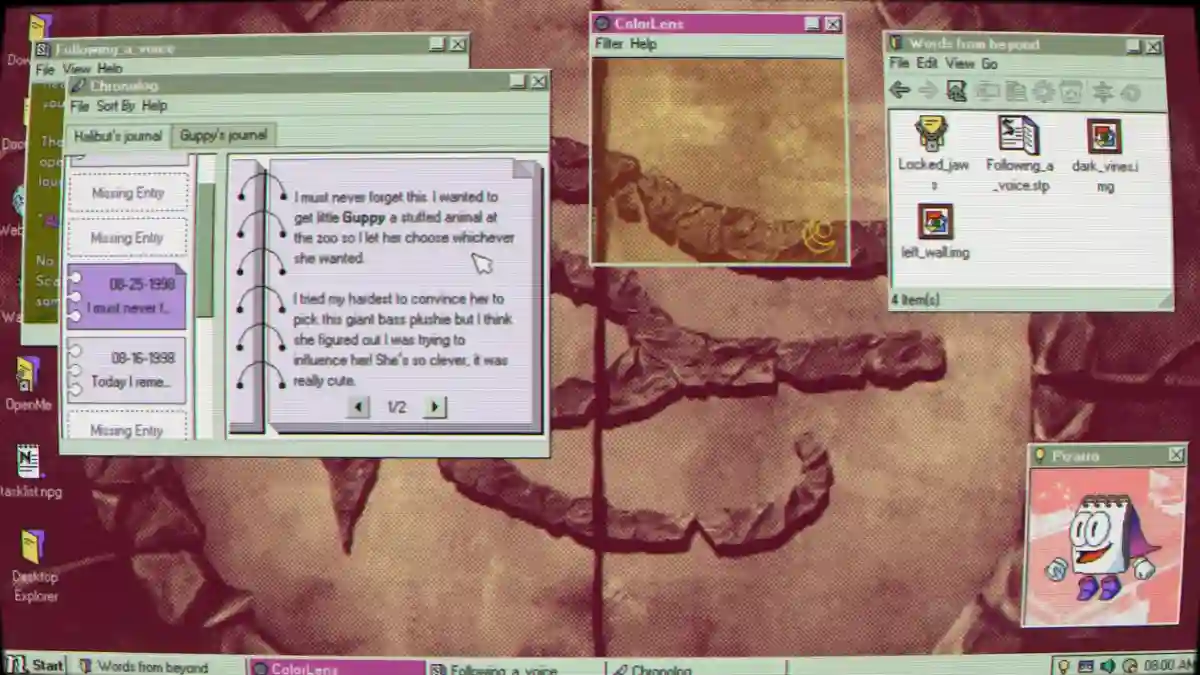
Desktop Explorer is a single-player psychological horror mystery game available on Steam, developed by Recurring Dream.
The game follows a mysterious 1990s-style computer that once belonged to the protagonist’s uncle and only works from time to time, revealing strange secrets hidden within the machine.
After inheriting the computer, your goal is to investigate it and uncover the truth behind its mysterious history.

AI receipt scanner & cash envelopes. 100% private.
You’ll need to explore the old operating system, examine file folders, read chat logs, open old applications, play pre-installed games, and investigate other hidden details.
In this guide, you’ll find the complete Desktop Explorer Walkthrough, covering Part 1 through Part 5 with solutions to help you progress through the game.
Desktop Explorer Walkthrough Part 1-5 Solution
Here is the complete Desktop Explorer Walkthrough – Part 1 to 5, including all the steps and solutions you need to progress through the first section of the game.
Part 1: Halibut Profile (Puzzles 0 to 10)
This is the initial chapter of the game, played under the “Halibut” user profile.
Puzzle 0 – Prologue
- Objective: Log in to the workstation.
- Solution: Select the Halibut profile, then open README.npg from the desktop.
Puzzle 1 – Go In
- Objective: Open the first locked steganography file.
- Solution: Double-click
LostOnTheShore.stpand enter the password:fortuna
Puzzle 2 – Ancient Ruins
- Objective: Find the hidden password.
- Solution: Open long_scroll.npg, scroll to the bottom, and find the magic word: Inanna.
Puzzle 3 – Narrow Tunnel
- Objective: Reveal the hidden shape.
- Solution: Open wide_papyrus_strip.npg, enable Format → Word Wrap, and resize the window until an elephant appears. The password is Elephas.
Puzzle 4 – Crossroads
- Objective: Extract the password from the code.
- Solution: Open detective_memories.stp, select View Source Code, and check the last paragraph. The password is Salve.
Puzzle 5 – Big Door
- Objective: Open the massive double door.
- Solution: Open the Left Door and Right Door folders, align the rune images to spell RENAMEIT, then rename key.err to key.img. Open the image to find the password: Portonus.
Puzzle 6 – Lights Out
- Objective: Find the hidden author metadata.
- Solution: Open etched_walls.img → Properties → Details and check the Author field: MMTT.
Puzzle 7 – Dark Sanctum
- Objective: Find the hidden file.
- Solution: Enable View → Hidden Files, open engraved_warning.npg, and find the password: Kassandra.
Puzzle 8 & 9 – Following the Dark & Altar
- Objective: Clear the altar and stack the stones.
- Solution: Find Rubicon in the stalagmite image details, reveal hidden files, and open Puzzle9_Altar using the password. Stack flat_stone_L.img, flat_stone_M.img, and flat_stone_S.img from largest to smallest to clear the path.
Puzzle 10 – Beyond
- Objective: Solve the four mural questions.
- Solution: Open ColorLens.exe, then view mural.img through the lens:
- Blue Filter: Crocodile
- Yellow Filter: 14
- Red Filter: Fire
- Journal Reference: Waltering different filters:
Part 2: The Temple
After completing the Cave, the computer crashes. Upon rebooting, log back into the Halibut profile.
Entering the Podium Chamber
- Open the Chronolog app from the Start Menu, click Write Entry in Guppy’s Journal to log the progress.
- Open
introduction.stpin The Temple folder to get the password:Shai - Use it to unlock the Podium Chamber folder.
- Inside
podiumChamber.stp, you will find the initial passwords for the three paths:- Path 1:
Anubis - Path 2:
Thoth - Path 3:
Ra
- Path 1:
Path 1 – Anubis (Topaz Gem)
- Open the Anubis folder and inspect anubisScale.img.
- Open Left Plate and Right Plate. Extract featherCoin.zip to shift the balance.
- Use ColorLens.exe → Yellow Filter to check the scale.
- Duplicate and compress heartCoin.img until the left side matches the right side (120 KB). Password: Ammit.
- Unlock Words_from_beyond with Ammit and write a journal entry mentioning Guppy’s Stegosaurus plushie.
- Open Following_a_voice.stp → View Source Code.
- Replace Abracadabra with Inanna (from long_scroll.npg) and save.
- Read the newly revealed wall symbols using the crocodile key. Password: SEKHETAARU.
- Unlock Locked_jaws with SEKHETAARU.
- Restore Topaz.img from the desktop Wastebin, then open it from the Yellow_lockbox folder.
Path 2 – Thoth (Raw Ore Gem)
Path 2: Thoth
- Open the Thoth folder and read hallOfMirrors.stp to learn about Max’s dream of joining the Cascadia Modern Arts Academy.
- Use ColorLens.exe → Blue Filter on mirror.img to reveal the hidden grid.
- Arrange mapFragment1.img and mapFragment2.img, then move from the Green block to the Red block without touching the walls.
- Arrange the spawned mapFragment3.img and three mapFragment4.img files to create the next path and repeat the challenge.
- Use the Blue Filter on the tablet in mirror.img to reveal 5267.
- Unlock the Hourglass folder with 5267.
- Read archeologist Notes.npg and note the four clues: blue moon, red eye, blood stained feathers, sapphire scepters.
- Use the Blue Filter on hourglass.img and adjust the system clock:
- 1:00 × 4 = 4
- 9:00 × 2 = 18
- 7:00 × 5 = 35
- 2:00 × 5 = 10
- Add the results: 4 + 18 + 35 + 10 = 67.
- Unlock the Blue_lockbox with 67 and open raw_ore.img.
Path 3 – Ra (Ruby Gem)
- Open yourHands.img and use ColorLens.exe → Red Filter to reveal the clue: “Only the heaviest coals will draw answers from flesh.”
- In furnaceRoom.stp, sort files by Size.
- Rename the largest file, burningCoal36.err, to burningCoal36.img.
- Duplicate it several times until the hand turns red/burnt. Password: SAHMAT.
- Unlock Tomb Site with SAHMAT.
- Rename corpse.err → corpse.npg to read the journal, then corpse.npg → corpse.img to view the victim.
- In Chronolog → Help, use the Blue Filter to reveal: WE ARE INCOMPLETE WITHOUT YOU.
- Add the phrase to the bottom of pillagedTomb.stp → Source Code, then save.
- Click the yellow hint lightbulb, summon Pizarro, and answer No when asked about your brother.
- Use the Red Filter on the help box in epitaph.npg.
- Compress deadlyMistake.img, open the ZIP, and close the cascading windows to reveal the password: MERNEITH.
- Unlock the Red_lockbox with MERNEITH and open Ruby.img.
Accessing Maxine’s Profile (m4x1mus)
- Place all three gems (
Topaz.img,raw_ore.img,Ruby.img) into their slots inscarabPodium.img. - The computer crashes and restarts at the user login screen.
- Select the m4x1mus profile and click Forgot Password.
- Input the answers to the security questions:
- Q1 (Plushie/Dino):
stegosaurus - Q2 (Academy):
cascadia - Q3 (Mother):
Faiza
- Q1 (Plushie/Dino):
- Log in to the profile.
Part 3: Maxine’s Profile & NextRooms Mall F1
Reinstalling Desktop Explorer
- Add Max’s Journal to Chronolog, then write a new entry in Guppy’s Journal.
- Arrange the three .skt fragments to form:
fridgemagnets.com/posts/m4x1mus/06-07-96 - Open WebSurfer2, enter the URL, and use the eye sketches to find the password: POWER.
- Restore DO_NOT_OPEN from the Wastebin and unlock it with POWER.
- Find and run DE_Installer.exe, then talk to Pizarro.
- Open Prologue → skyline.img and desperate_steps.stp.
- Do not move the mouse or click. Wait for the Maze Screensaver to start.
Navigating the Maze Screensaver
- Use WASD or the Arrow Keys to move.
- Find the caterpillar mural, turn right, and locate the locked door.
- Continue to the butterfly mural, then turn right and touch the floating Diamond.
- After the world flips upside down, return to the door area and collect the Golden Key.
- Touch the Diamond again to restore the world, then unlock the exit door.
- Return to the desktop and open the journal entry.
- Log in to NextRooms:
- Username:
The_Max - Password:
sweaters123
- Username:
NextRooms Floor 665 & Mall F1
- Interact with the camera and computer to receive computerFile.npg.
- Open it to find:
RC-CLR7V40RC-L1Z4RD5
- Use
RC-CLR7V40in Invite Roomie to restore Hazel’s chat, then get the Kojami Code: North → West → South → East → South → West. - Use
RC-L1Z4RD5to restore Femur’s chat. - Enter the maze next to Femur’s room and use the Clock as your compass:
- Hour hand = North/Up
- Minute hand = South/Down
- Follow the Kojami Code directions to exit the maze and reach Mall F1 Court.
Part 4: Mall F1 Court Puzzles
Restoring Power to Mall F1
- Pick up the Broken Down Camera to receive the instantPhotos folder.
- Pick up the Children’s Menu to get Rabbit.skt.
- Collect the Coin from the fountain to receive fountainCoin.img in looseChange.
- Find the Page between Bee Kind and Wilson’s Pet Store to add a journal entry.
- Enter the Janitor’s Closet and open Circuit Box 1.
- Connect the Red, Green, and Blue wires to their matching terminals without crossing them to restore mall power.
Shop 1: Bee Kind Video Store
- Pick up the floor item to get Kamarena’s roomie code:
RC-CLR7V40. - Invite Kamarena through NextRooms and open her chat to get the quiz URL.
- Open the URL in WebSurfer2 and answer:
- Soundtrack: The Sweaters
- Monster: Zombie
- Bait Color: Red
- Trilogy: Pineapple Summer
- Correct answers add video.img to the instantPhotos folder.
Shop 2: Installation Wizard Magic Shop
- Interact with the fortune teller machine to get fortuneTicket.npg with red and blue coordinates.
- Open Rabbit.skt and connect the matching coordinates to reveal card shapes.
- The first shape reveals 6D (Six of Diamonds).
- In cardDeck, rename Name_your_card.img to 6D.img and open it to get part of the password.
- Repeat the process for the remaining shapes to reveal the password: Cronos.
- Enter Cronos into the magic shop display cabinet to obtain magic.img.
Shop 3: Wilson’s Pet Store
- Inspect the broken aquarium and view its source code to learn that the fish have stripes.
- Pick up CJ’s roomie code behind the counter:
RC-L1Z4RD5. - CJ’s reptile preference order is: Chameleon → Snake → Bearded Dragon → Turtle.
- Use the Eraser tool on the reptileTank.skt files to reveal the colored reptiles.
- Set the Aquarium screensaver with a 10-second wait time.
- Count the stripes in CJ’s preferred order:
- Green Chameleon: 3
- Red Snake: 1
- Yellow Bearded Dragon: 4
- Blue Turtle: 2
- Enter 3142 into the cash register to receive aquarium.img.
Unlocking the Paint Source Store
- Open WebSurfer2 and visit:
gamebagels.com/guides/hazel62. - Read the Maze Secret Path guide: East → South → East → North → East → South.
- Follow the directions through the Lost Corridors maze on NextRooms Floor 665.
- Enter the Paint Shop and pick up the Magic Key from the counter.
The Paint Source Store
- Use the Magic Key to unlock the Magic Ball case and take magicBall.img.
- Shake the ball and use the Blue Filter to reveal the color values:
- Red: +2 | Yellow: +1 | Purple: +0 | Green: −3 | Blue: −2
- Count the shape corners on the video store TVs and apply the color multipliers to create the 3×3 grid:
8 1 6 / 3 5 7 / 4 9 2 - Match the grid to the Paint Shop paintings:
- Painting A: 816 (or 896)
- Painting B: 712
- Painting C: 354
- Unlock all three paintings to get the paint and photo.
- Run SketchyAddOn.exe to unlock new palette colors.
Powering the Elevator
- Return to the Janitor’s Closet and unlock the locker with 0321.
- Read crime_scene.stp and add a new journal entry.
- Solve Circuit Box 2 using the new colors from Sketchy Add-On.
- The elevator will power on—use it to reach Mall F2.
Part 5: Late Game & Admin Walkthrough
Mall F2 Puzzles
- Vending Machine: Complete an arcade game to get a ticket. Duplicate and zip the ticket files until you have enough to buy the coin.
- Nonogram: Open the nonogram file and complete the grid puzzle.
- Dress-Up Mannequin: Equip Green Tie + Blue Shirt + Glasses.
Admin Walkthrough
- Restore Broken Files: Open the terminal and run:
chrono restoreandrestore:shame/---.res. - Analysis Tool: Open de_analysis and enter the password:
goldenratio. - Admin Panel: Open the administrator terminal and enter:
TAROCCHI. - Portrait Puzzle: Place your cursor over the window light source → Feel Wall → Use Lever.
- Orb Puzzle: Interact in this order: Middle Eye → Left Hand → Right Hand.
Final Profile: Guppy (Ending)
- Log in using the Guppy profile.
- Enter the Desktop Explorer password:
THESEUS. - Enter the painting magic word:
inanna. - In the final Halibut cave maze, follow: Left → Right → Left → Below → Left → Right → Below.
- Enter:
bigCatch,dontForget, andanglerTrio.
Chess Boa:
- King: B1
- Knight: B2
- Rook: C1
- Knight: C2
- Rook: A3
- Pawn: A2
